Administering BLS steps can be the difference between life and death in an emergency situation. BLS is a set of critical actions, including chest compressions and rescue breaths, designed to maintain circulation and breathing until professional help arrives.
Every second counts when someone experiences a cardiac arrest, and knowing how to respond promptly is crucial.
Around 10,000 cardiac arrests occur in the workplace each year in the U.S., yet only 50% of employees can locate an Automated External Defibrillator (AED) at their workplace. This highlights the importance of understanding and practicing BLS steps.
By following a simple, structured approach, anyone can help sustain a person’s life until advanced medical care is available.
In this article, we outline the five basic steps that define the BLS guidelines for adults and prepare you for the appropriate action when it is most needed.
The Role of Automated External Defibrillator (AED)
An Automated External Defibrillator (AED) is a portable device that delivers a controlled electric shock to the heart during sudden cardiac arrest (SCA). Its primary role is to restore a normal heart rhythm by interrupting chaotic electrical activity.
AEDs are designed to be user-friendly, with clear audio and visual instructions, so even non-medical personnel can operate them effectively.
Using an AED within the first few minutes of cardiac arrest can significantly increase survival rates, sometimes by more than 50%. To use an AED, turn it on and follow the voice prompts, which will guide you through attaching the pads, analyzing the heart’s rhythm, and delivering a shock if needed. It’s vital to continue with chest compressions while the AED is set up and between shocks.
The presence of an AED, along with knowledge of BLS steps, can make a life-saving difference in emergencies, especially in workplaces and public spaces.
Five Important Steps to Administer Basic Life Support for Adults
In emergencies, quick action can mean the difference between life and death. The Basic Life Support (BLS) for adults consists of three simple steps that will enable you to act appropriately during an emergency. Let’s jump right into the five important steps you need to understand when performing BLS steps for adults
Step 1: Assess the Situation and Ensure Safety
Before you conduct Basic Life Support, the first priority is to evaluate the scene, as well as the safety of both the rescuer and the victim. This scene safety and assessment cpr can change the way the emergency situation develops.
Before approaching the person in distress, quickly scan the environment for potential dangers. This includes checking for things like:
- Traffic (if on a street or road)
- Fire or smoke
- Electrical hazards
- Sharp objects or broken glass
If the area is unsafe, do not approach the victim until the hazard is removed or you can safely assist.
You also need to assess the person’s responsiveness. Approach them and gently shake their shoulders while speaking loudly, “Are you okay?” This helps determine if they are conscious. If there’s no reaction, look for signs like breathing or small movements.
For example, if someone collapses at a workplace, you should immediately check if they respond to your voice or touch. If they don’t, it indicates they need urgent help, and you should proceed to the next BLS steps.
This quick check ensures you don’t waste time and can act quickly to provide life-saving support.
Step 2: Check for Breathing and Pulse
Checking for breathing and pulse is essential in identifying if a person needs immediate life-saving intervention. When a person collapses, it’s crucial to quickly determine if they are breathing normally. This involves observing chest movements and listening for the sound of air passing through their mouth or nose. Abnormal breathing, such as gasping or irregular, shallow breaths, should be treated as a sign of distress. If no signs of normal breathing are found, it’s an indication that the person may be in cardiac arrest and requires immediate action.
The next step is to check for a pulse, which helps confirm the need for CPR. Feel for a pulse on the carotid artery, located on the side of the neck. It’s important to complete this check within 10 seconds to avoid delaying necessary interventions. Studies suggest that many bystanders hesitate to start CPR because they’re unsure how to check for a pulse, leading to delayed help when time is critical.
Having abnormal or no breathing at all, combined with a pulse that cannot be felt, indicates that chest compressions should be started without delay. Timely recognition of such initial evaluations can help save valuable seconds making survival possible.
Step 3: Perform Chest Compressions
Performing effective chest compressions is the most critical part of Basic Life Support. Studies show that immediate CPR can double or even triple a person’s chance of survival after cardiac arrest.
To perform chest compressions, follow these simple steps:
- First position yourself next to the person.
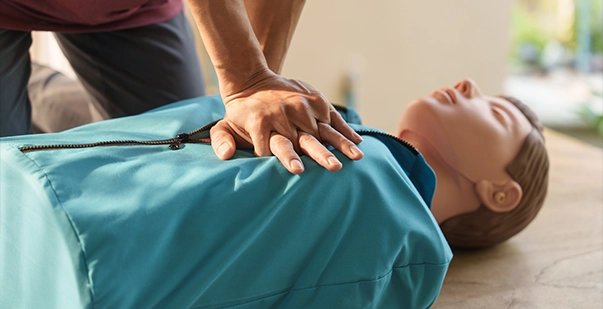
- Place the heel of one hand on the center of the chest, just below the line of the nipples, and put your other hand on top, interlocking your fingers.
- Keep your arms straight and your shoulders directly over your hands. Push down hard and fast, pressing at least 2 inches (5 cm) deep, and aim for a rate of 100-120 compressions per minute.
- Allow the chest to fully recoil between compressions, but don’t lift your hands off.
Using the rhythm of a song like “Stayin’ Alive” can help you maintain the correct pace. Consistent, uninterrupted compressions are essential, so try to minimize any pauses.
Step 4: Provide Rescue Breaths (If Trained)
Providing rescue breaths is a crucial part of Basic Life Support, but it’s often overlooked or done incorrectly. When performing rescue breaths, it’s essential to maintain a tight seal around the person’s mouth to prevent air from escaping.
One lesser-known detail is that exhaling too forcefully can push air into the stomach rather than the lungs, leading to complications like vomiting. To avoid this, each breath should be delivered gently over about one second, just enough to make the chest visibly rise.
If you’re not trained in giving rescue breaths, it’s recommended to focus on chest compressions only, as they can still keep blood circulating to vital organs. However, mastering the full process, including rescue breathing, can significantly improve survival chances.
To build confidence and ensure proper technique, opt for a basic life support certification. This training covers essential skills, including rescue breaths, and prepares you for real-life emergencies.
Step 5: Continue Until Help Arrives or the Person Recovers
Keep performing cycles of 30 chest compressions and 2 rescue breaths until one of three things happens: professional medical help arrives, an Automated External Defibrillator (AED) is ready for use, or the person starts breathing normally again. Consistency is key—pausing or stopping too soon can reduce the chances of survival.
Imagine you’re administering BLS to a colleague who suddenly collapsed at work. You’ve started CPR, and after a few minutes, another colleague arrives with an AED. You continue chest compressions while they set up the device.
After following the AED’s instructions, you resume CPR until paramedics arrive. Even if it feels like a long time, your continuous effort can keep blood flowing to vital organs, increasing the person’s chances of survival.
Key Tips for Performing Effective BLS
In an emergency, time is of great importance. Here are some practical ideas that might save a life in selected conditions. Here are some helpful tips that will provide you with the knowledge and skills necessary to give confident, caring, and effective Basic Life Support:
1. Stay Calm and Focused
In an emergency, it’s important to remain calm so you can think clearly.
Take a deep breath to steady your nerves. For example, if you find someone unresponsive, assess the scene for safety before approaching them.
If there’s no immediate danger, focus on helping the person rather than panicking. Your calm demeanor can also help reassure bystanders and create a more effective environment for providing help.
2. Act Quickly
Time is critical in an emergency. Start Basic Life Support (BLS) as soon as you recognize that someone is unresponsive and not breathing.
Each second counts, especially during a cardiac arrest, where brain damage can occur quickly without oxygen. If you’re alone, call emergency services immediately after starting BLS.
If others are present, have someone else make the call while you begin the life-saving steps. Quick action can significantly improve the chances of survival.
3. Proper Hand Placement for Compressions
To perform effective chest compressions, place the heel of one hand on the lower half of the person’s breastbone (sternum). Then, place your other hand on top, interlocking your fingers. Keep your arms straight and use your body weight to push down.
Make sure to push hard enough to compress the chest about 2 inches deep. Avoid pushing on the ribs, as this can cause injury.
Proper hand placement is crucial for delivering effective compressions.
4. Use the AVPU Scale
The AVPU scale helps quickly assess a person’s responsiveness. It stands for Alert, Verbal, Pain, and Unresponsive.
First, check if the person is Alert and aware of their surroundings. If not, try speaking to them (Verbal) to see if they respond. If they don’t respond to voice, apply a gentle pinch (Pain) to see if they react.
If there’s still no response, they are Unresponsive. For example, if someone collapses, using the AVPU scale helps determine the urgency of assistance needed.
5. Create a Seal When Providing Rescue Breaths
When giving rescue breaths, make sure to create a tight seal over the victim’s mouth with your own. This helps the air you blow in reach their lungs instead of escaping.
To do this, pinch their nose shut, and cover their mouth completely. Give two breaths, each lasting about one second, while watching for their chest to rise.
This shows that the air is going in properly, which is crucial for helping someone who isn’t breathing.
6. Utilize the Heel of Your Hand
For adult CPR, use the heel of your hand to perform chest compressions. This part of your hand is stronger and allows you to apply more pressure effectively.
Place the heel of one hand in the center of the chest, then put your other hand on top and interlock your fingers.
Keep your arms straight and use your body weight to push down hard and fast, aiming for 100-120 compressions per minute. This technique helps maintain blood flow to vital organs.
7. Know When to Call for Help
If you’re alone and performing CPR, don’t hesitate to call emergency services after a minute of care.
This means you should focus on giving CPR for about a minute, then leave the victim to call for help or ask someone nearby to do it.
Getting professional help early is crucial because it increases the chances of survival, ensuring the victim gets advanced medical care as soon as possible.
8. Incorporate AED Use Early
Using an Automated External Defibrillator (AED) quickly can save a life during a cardiac arrest. If one is available, grab it as soon as you can.
Turn it on and follow the voice prompts, which will guide you through the steps. The AED will analyze the heart’s rhythm and tell you if a shock is needed.
Early defibrillation, along with CPR, greatly increases the chances of survival, so don’t hesitate to use it.
9. Practice the ‘Look, Listen, Feel’ Technique
The “Look, Listen, Feel” technique is a way to check if someone is breathing.
First, look at their chest to see if it rises and falls. Then, listen for any sounds of breathing, like wheezing or gasping. Finally, feel for air on your cheek by placing your face close to theirs.
Do this for about 10 seconds. If they’re not breathing or only gasping, it’s time to start CPR and call for help.
10. Debrief After the Event
After performing BLS, it’s important to have a debriefing session with your team. This means discussing what happened during the rescue, what worked well, and what could be improved for next time.
For example, if a team member struggled to find the AED, you could talk about better ways to locate it quickly in the future. This reflection helps everyone learn and grow, making future responses more effective.
Plus, discussing the emotional impact can provide support, ensuring everyone feels heard and understood after a stressful situation.
Get Trained in BLS and Be Prepared
Administering Basic Life Support (BLS) can be a life-saving skill in emergencies. Following the five steps—assessing the situation, calling for help, performing chest compressions, providing rescue breaths if trained, and using an Automated External Defibrillator (AED)—can significantly increase the chances of survival for someone in cardiac arrest. It’s essential to stay calm and act quickly, as every second counts.
Remember, you don’t have to be a medical professional to make a difference; anyone can learn and perform BLS. Taking a course in CPR and BLS can prepare you for unexpected situations and help you feel more confident when responding. Together, we can create a safer community where more lives are saved in emergencies.
Consider getting trained and spreading the word about the importance of BLS, as knowledge and action can change outcomes for those in need.


