When it comes to saving lives, knowing how to perform CPR and rescue breathing can make a real difference. Rescue breathing, also known as mouth-to-mouth resuscitation, is a vital technique. It is used when someone is not breathing or struggling to breathe on their own.
When you enroll with the American HealthCare Academy, you learn all the nuances and differences of rescue breathing vs. CPR. Our online courses are comprehensive and help you understand the steps of CPR so well that you’ll never be clueless about the next steps. You’ll always be prepared to play the role of a Good Samaritan. You can call us at 1-888-277-7865 for more details.
What is CPR?
The fundamental goal of CPR is to get the person’s blood back to normal circulation so that oxygen can go to the essential organs, particularly the brain. When the brain’s oxygen supply is cut off, its cells begin to die, which can result in permanent brain damage or brain death.
What is Rescue breathing?
Rescue breathing is a vital technique used to help someone who is having trouble breathing or has stopped breathing altogether. Its purpose is to provide that essential oxygen until professional medical help arrives.
Read more: ACE-Recognized CPR/AED & First Aid Courses for Fitness Professionals
How to give CPR and rescue breathing?
- Check for Safety: Make sure the area is safe for both you and the person in need. Look for any dangers before you start.
- Responsiveness: To test a person’s responsiveness, give them a light tap and ask them loudly, “Are you okay?”
- Call for Help: If someone’s around, ask them to call 911 or your local emergency number. If you’re alone, call for help yourself before you begin CPR and rescue breathing.
- Position the Victim: Gently lay the victim flat on their back on a firm surface. To clear their airway, tilt their heads back a little.
- Seal the Nose: Pinch the person’s nose shut with your fingers to make sure air doesn’t escape.
- Give Breaths: Take a normal breath and cover the person’s mouth with yours, creating a seal. Give two rescue breaths, one second apart. As you take each breath, look to see if your chest rises.
- Check Chest Movements: After the breaths, look to see if the person’s chest rises. If the chest rises, then you have done it right.
- Repeat and Watch: If the chest doesn’t rise, reposition the head and try again. Repeat rescue breaths every 5 seconds until the person starts breathing or help arrives.
When to give rescue breaths?
Knowing when to give rescue breaths can make a crucial difference in saving a life. Here are 4 situations when you should give rescue breaths:
- Unresponsiveness
If a person is unresponsive and not breathing normally, you should start rescue breaths as part of CPR.
- No Signs of Breathing
If you can’t see the person’s chest moving or hear them breathing, it’s a sign they need help with their breathing.
- Gasping Breaths
Sometimes, a person might be taking gasping breaths that aren’t effective. In this case, rescue breaths are needed to give them proper oxygen.
- Along with Chest Compressions
In CPR, rescue breaths are often given after every 30 chest compressions. The breaths help circulate oxygen to the body and brain.
Read More: Adult CPR Compression Depth: Correct Depth + Compression for Improved Recovery
How Long Should You Give Rescue Breaths During CPR?
For adults, after 30 chest compressions, you’ll give two rescue breaths. Each breath should last about 1 second and make the chest rise visibly. This helps oxygen reach the lungs and the body.
For children and infants, the pattern is a bit different. After 30 chest compressions, you’ll give two gentle breaths while giving a rescue breath for child. Each breath should also last about 1 second, just like with adults.
What are the different types of rescue breathing?
There are four different types of rescue breathing:
- Mouth-to-mouth resuscitation
When mouth-to-mouth breathing is used, the victim’s chest rises as air is delivered from the rescuer to the victim’s body through their mouths.
- Mouth-to-nose resuscitation
The victim’s body receives air through the nose from the rescuer’s mouth. This usually happens when the person has been hurt or is unable to breathe through their mouth.
- Mouth-to-mouth and nose resuscitation
This treatment is mostly appropriate for newborns and babies under the age of one.
- Mouth-to-mask resuscitation
The risk of transmitting infectious diseases has led to an increase in mouth-to-mask resuscitation in recent years. The majority of experts suggest using the method when providing rescue breaths.
Read More: The Importance of Compression-Only CPR for Infants and Children
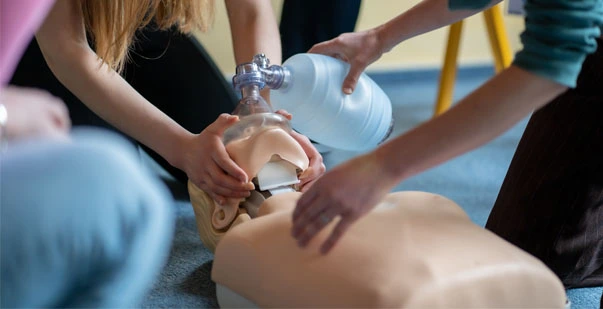
Using a Bag-Mask for Rescue Breathing
When it comes to rescue breathing, a bag-mask can help provide oxygen and save a life. Here’s how to use it:
Step 1: Prepare the Bag-Mask Device
Make sure the bag-mask is ready to use. Check that the mask fits well over the person’s mouth and nose.
Step 2: Position the Person
Put the person on a stable, flat surface with their back facing up. To clear the airway, tilt their head back a little.
Step 3: Hold the Mask
Hold the mask over the person’s face with one hand, using your thumb and index finger to create a seal. Make sure the other fingers support the jaw.
Step 4: Squeeze the Bag
With your other hand, squeeze the bag to deliver a breath. Watch the person’s chest rise. You want to give a breath that’s enough to see the chest rise, but not too much.
Step 5: Repeat and Monitor
Give rescue breaths every few seconds, watching the chest rise each time. If the person starts breathing on their own, stop using the bag-mask.
Conclusion
Rescue breaths are a crucial part of CPR. Our Online CPR/AED training and certification courses provide you with the chance to learn everything about CPR and techniques of rescue breathing. Additionally, if your CPR certification is out of date, you can easily update your skills and knowledge by signing up for our online CPR recertification.

