Adult CPR and Infant CPR—a very important discussion that can literally be life-saving for a baby and yet, few people know there is a proper way of giving CPRs for babies.
As per the CDC, 3400 baby deaths happen in the US suddenly and unexpectedly each year. Not all of these cases could be avoided by CPR, but knowing this technique would surely make a lot of difference in urgent circumstances.
At this point a common response could be: “CPR is CPR, isn’t it?” At which the answer is no! Newborns are not small grown-up people and they need a gentler touch. In fact, applying adult CPR methods on a baby will be more dangerous to the baby’s life. That’s why it’s super important to learn the proper way to perform infant CPR.
We got you; we are here to explain the difference between the two to make you even more prepared for the actual experience. We’ll also see the basic steps on how to perform an infant CPR properly. Bear in mind that being prepared is half the battle!
Difference Between Adult CPR And Infant CPR
What makes CPR on infants different from adult CPR? Let us see the most significant differences:
- Age and Size:
First of all, it is vital to know that infant CPR applies to children who are less than 1 year old. If the child is over 1 year, you will use child CPR which slightly differs from the one used on adults. Infants are extremely fragile thus the body sizes are very small so everything has to be scaled down.
- Chest Compressions:
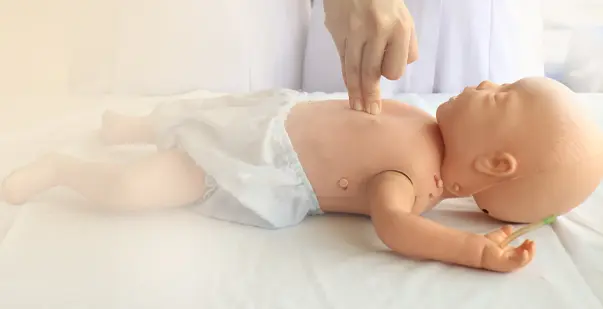
For the adults, you press down with the heel of your hand on the chest. But for infants? You will use only two fingers of your right hand to do this. Yep, that’s right – two fingers are all it takes. You will apply these fingers at the midst of the chest and just below the place of the nipple.
The depth of compressions is different too. For adults, you’re aiming for about 2 inches deep. For infants, you only want to compress about 1.5 inches – that’s about one-third the depth of the chest.
- Rescue Breaths:
While giving rescue breaths to an infant, you have to cover the infant’s mouth and nose with your mouth. It differs from the ordinary adult CPR, where one is required to pinch the nose and blow in the mouth. Also, you’ll give much gentler breaths to an infant – think small puffs rather than full breaths.
- Compression-to-Breath Ratio:
For adult CPR, in a situation where there is only one rescuer, the compression:ventilation ratio is 30: 2. However, for infant CPR, it is 30:2 if the rescuer is alone while in case there are two of them, it will be 15:2.
- Checking for Responsiveness:
You should raise your pitch and shake the shoulders of an adult you want to command attention. The strokes administered also vary depending on the age of the child. For instance, for infants, the practitioner will lightly pat the bottom of the child’s feet or lightly brush their arm. Never shake a baby!
- Choking Response:
If an infant is choking, you’ll use back blows and chest thrusts, not the Heimlich maneuver like you would for adults.
Steps To Perform Infant CPR
Now let’s see the steps to perform a cpr infant:
1. Examine the Scene and the Baby
First things first, make sure it’s safe to approach the baby. Look for any dangers like electrical hazards or fire. Once you’re sure it’s safe, check if the baby is responsive. Gently tap the bottom of their foot and call their name loudly. Babies can be deep sleepers, so make sure you’re really trying to wake them.
2. Check for Breathing
If there is no response, gently stimulate them and quickly look for breathing. Check for the rise and fall of the chest, listen to the breath, and feel if the baby breathes through the nose or mouth. Perform this for no more than 10 seconds. Remember, gasping isn’t normal breathing.
3. Call for Help
This is when you need to act fast; if the baby is unresponsive or if it is not breathing properly. Shout for help. If someone is around, make them dial the 911 emergency number and run for an AED if any is close by. If you are alone, start CPR immediately.
4. Start Chest Compressions
Find a firm and flat surface and place the baby on their back. Use two fingers to compress the center of the chest, just below the nipple line. Push hard and fast – about 1.5 inches deep at a rate of 100-120 compressions per minute. That’s almost two compressions every second!
The key here is to allow the chest to fully recoil between each compression. It’s this ‘pump’ action that helps circulate blood.
5. Open the Airway
After 30 compressions, it’s time for rescue breaths. Gently tilt the baby’s head back to open the airway. Be careful not to tilt too far – a baby’s neck is delicate, and you’re aiming for a neutral position.
6. Give Rescue Breaths
Cover the baby’s mouth and nose completely with your mouth. Give two gentle puffs of air, each lasting about 1 second. You’re not trying to fully inflate their lungs – just give enough air to make the chest visibly rise.
If the chest doesn’t rise, re-adjust the head tilt slightly and try again. If it still doesn’t work, the airway might be blocked.
7. Continue CPR
Keep alternating between 30 chest compressions and 2 rescue breaths. This is tiring work, so if there’s another person available, take turns every 2 minutes or so to avoid fatigue.
8. Use an AED If Available
If someone brings an AED, use it immediately. Turn it on and follow the voice prompts. For babies, use pediatric pads if available. If not, adult pads can be used – just make sure they don’t touch each other on the chest.
9. Keep Going
Continue CPR until you see obvious signs of life (like normal breathing), professional help arrives, or you’re too exhausted to continue. Even if the baby starts breathing, keep them in the same position and monitor closely until emergency services arrive.
Remember, this guide doesn’t replace proper CPR training. In an emergency, doing something is better than doing nothing, but getting certified in CPR can make a real difference in these critical situations.
10 Common Mistakes to Avoid in Infant CPR
It is quite simple to make a slip with regard to correct infant CPR irrespective of the intention to do the right thing especially when one is hurried up. Here are some common errors to avoid when performing CPR on an infant:
1. Using Too Much Force
Babies are delicate. This is so especially on chest compressions where one can be tempted to apply much force than is required. Aim for about 1.5 inches deep, or about one-third of the chest depth. They might make you feel like they are not going hard enough, just trust the technique though.
2. Compressions Are Too Slow
Compressing is usually too slow and if the heat of the moment overcomes you then you could compress slowly. The optimal rate for delivering chest compressions should be between a rate of 100-120 folds per minute. Which is pretty quick really, around 2 compressions per second.
3. Preventing the Full Chest Recoil
Make sure that you allow full chest rising between the accomplices of chest compression. It is rather this full ‘pump’ distending that accomplishes the circulation of the blood.
4. Incorrect Hand Placement
In the case of the infant, use two fingers to compress the center of the chest, just below the nipple line. Using your entire palm, which people often do with adults may lead to internal bleeding.
5. Tilting the Head Too Far Back
Opening the airway, tilt the head back slightly to get to a neutral position only. Babies’ airways are narrow and can easily be blocked which can be attributed to tilting of head to the extent that it nearly touches the chest.
6. Blowing Too Hard During Rescue Breaths
Babies’ lungs are small. Use gentle puffs of air, just enough to make the chest rise. Their lungs are affected if they blow too hard.
7. Delay in Calling for an Emergency
In the panic you may neglect to dial the emergency number 911. Remember, if you’re alone, do CPR for about 2 minutes before stopping to call for help.
8. Stopping CPR Too Soon
Continue until help or medical emergency arrives or the baby wakes up. Frankly, it is very tiring, but do not lose heart.
9. Moving the Baby Unnecessarily
Let the baby be unless the baby is in some kind of an extreme danger. CPR when and where you can because their condition could lead to spinal damage if not corrected.
10. Panicking and Forgetting the Steps
Panic is completely natural at this point, but trying to calm down is important for the next steps. Focus your attention on what you are currently doing, ‘Take a deep breath’. That is why practice and adequate training can play such a crucial role.
Be Prepared for An Infant CPR
We’ve covered a lot about CPR on an infant, and here are the key takeaways:
- Infant CPR is different from adult CPR. It’s gentler and tailored to a baby’s small body.
- Key differences include using two fingers for compressions, gentler breaths, and covering both mouth and nose.
- Common mistakes are using too much force, compressing too slowly, and forgetting to call for help.
- While knowing the basics helps, professional training is crucial for building confidence and skill.
In an emergency, taking action is always better than doing nothing. But with proper training, you’ll be truly prepared to help if needed.
Next steps? Consider taking a professional infant CPR course. Share this information with other caregivers. The more people who know infant CPR, the safer our babies will be.
Lastly, prevention is key. Create safe environments for infants and always supervise them closely. By learning infant CPR, you’re not just gaining knowledge – you’re becoming a potential lifesaver. And that’s a pretty amazing thing to be.
Stay prepared, stay safe, and keep those little ones protected!


