Seeing someone struggling to breathe is alarming, but knowing how to help can make a significant difference. Healthcare workers use the endotracheal tube (ETT) to save lives in such situations.
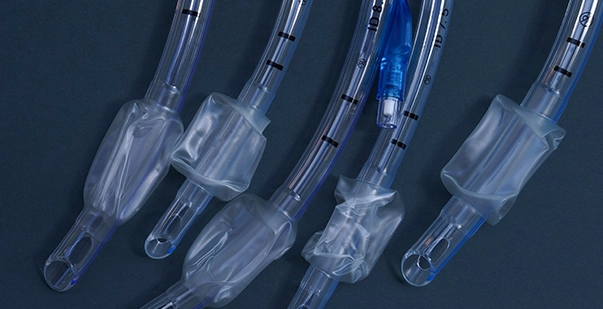
An endotracheal tube is a medical device used to maintain an open airway in patients who cannot breathe on their own. It is a flexible, hollow tube inserted through the mouth or nose into the windpipe (trachea). By using the tube, you can ensure that air reaches the lungs, allowing patients to receive oxygen.
ETTs are commonly used in critical situations such as asthma attacks, respiratory failure, or cardiac arrest. Knowing how an ETT works can prepare you to help if you ever find yourself in an emergency where someone is struggling to breathe. In this guide, we’ll go over everything you need to know about an endotracheal tube. We’ll discuss the components of an ETT and how to use one in case of need.
What is Intubation and When Do We Perform It?
Imagine a situation where someone is unable to breathe on their own due to a severe illness or injury, and the doctor says that you have to intubate the patient. The next question you will have is, “What does intubated mean?” It means that a tube has been placed in the airway to help a person breathe. We perform intubation during situations such as:
- During Surgery: General anesthesia can make a person lose the ability to breathe on their own. The endotracheal tube (ETT) helps keep the airway open and connects to a ventilator, which provides a steady flow of air and oxygen.
- Emergency Situations: In emergencies such as severe asthma attacks, respiratory failure, or cardiac arrest, an ETT is quickly inserted to secure the airway and help with breathing.
- Critical Care: Patients with severe illnesses or injuries might need an ETT to ensure they continue to breathe properly.
- Severe Trauma: In cases of severe trauma, such as head injuries or major accidents, intubation may be necessary to maintain an open airway and support breathing.
What are the Components of the Endotracheal Tube?
Did you know that roughly 413,000 intubations are performed in US emergency departments every year? Now that we know what is an ETT let us discuss its main parts:
- Tube
This is a long, hollow plastic tube. It is inserted into the person’s windpipe (trachea) to keep the airway open and allow air to reach the lungs. The tube is flexible enough to fit comfortably in the trachea but firm enough to keep its shape during use.
- Cuff
Near the end of the tube that goes into the windpipe, there is a small inflatable balloon called a cuff. When inflated, the cuff seals off the space between the tube and the trachea wall. This ensures that air goes directly into the lungs and doesn’t escape around the tube. It also helps prevent secretions from entering the lungs, reducing the risk of infection.
- Pilot Balloon
The pilot balloon is a tiny balloon located outside the body, connected to the cuff by a thin tube. It indicates the cuff’s status; when the pilot balloon is inflated, the cuff inside the trachea is also inflated. This allows the doctor to monitor and adjust the cuff’s pressure as needed.
- Connector
At the end of the tube that stays outside the mouth, there is a connector. This part is used to attach the ETT to a ventilator or breathing machine. The connector ensures a secure fit and allows for the delivery of oxygen and other gases directly into the lungs.
- Markings
The tube has numbers and lines marked on it. These markings help doctors determine how deep the tube is placed inside the windpipe. Proper ET tube placement is crucial for effective ventilation and patient safety. The markings are measured in centimeters, allowing precise adjustments during insertion.
- Murphy Eye
The Murphy Eye is a small hole located near the end of the tube inside the trachea. This secondary opening helps prevent the tube from getting blocked. If the main opening at the tip of the tube becomes obstructed, the Murphy Eye ensures that air can still flow through the tube, providing an additional safeguard.
These components work together to ensure that the ETT functions effectively, helping patients breathe properly when they are unable to do so on their own.
How to Use an Endotracheal Tube
Now that we know what intubation is let us see how to perform it using an ET tube. Using an Endotracheal Tube (ETT) is a careful process that requires skill and attention to detail. Each step is essential to ensure that the patient can breathe properly and safely. Here’s a step-by-step guide to how doctors do it:
- Preparation
The doctor collects all the necessary tools, including the ETT, a laryngoscope (a special tool to see inside the throat), and a ventilator (a machine that helps with breathing). The patient is given medicine to make them sleep (anesthesia) and relax their muscles. This helps prevent movement and makes the process smoother and safer.
- Positioning
The patient is laid on their back with their head tilted back slightly. This position helps to open the airway, making it easier for the doctor to insert the tube. The doctor stands at the head of the bed, where they have the best angle to see and access the patient’s throat.
- Inserting the Tube
The doctor uses the laryngoscope to gently lift the tongue and see the vocal cords, which are the gateway to the windpipe (trachea). The doctor carefully guides the ETT through the mouth, past the vocal cords, and into the trachea, a step that requires precision to avoid injury.
- Inflating the Cuff
Once the tube is in place, the doctor inflates the cuff by adding air through the pilot balloon. The inflated cuff seals the tube inside the trachea, ensuring that air goes directly to the lungs and doesn’t escape around the tube.
- Securing the Tube
The tube is secured by taping or tying it to keep it from moving. This helps prevent accidental dislodgement, which could disrupt the patient’s breathing. The doctor listens to the lungs using a stethoscope to check if air is entering both lungs equally and confirm that the tube is correctly placed.
- Connecting to a Ventilator
The tube is then connected to a ventilator. This machine helps the patient breathe by delivering controlled amounts of air or oxygen directly into the lungs.
- Monitoring
The patient is closely monitored to ensure the tube stays in place and the patient is getting enough air. Vital signs, such as oxygen levels, heart rate, and blood pressure, are regularly checked to ensure the patient’s stability.
By following these steps, doctors can effectively manage the airway and provide life-saving support to patients in need. Learning to use an ET tube is an essential skill for healthcare providers, especially those trained in Basic Life Support (BLS).
Read More: How to get BLS (Basic Life Support) certification in 10 Steps?
Endotracheal Tube Size Selection for Different Age Groups
The correct size of an ET tube varies between children and adults. For adults, tube size is usually based on gender and body size. Adult males typically need larger tubes (around 7.5-8.5 mm in diameter), while females need slightly smaller tubes (around 7.0-8.0 mm).
In pediatrics, tube size is more precisely calculated using formulas based on the child’s age or weight, as children have smaller and more delicate airways. For instance, a common formula is (age/4) + 4 for uncuffed tubes. ET tube size for cuffed ones is calculated using the formula (age/4) + 3. The right size of the tube ensures proper ventilation and minimizes airway trauma.
Side Effects Of Intubation
While intubation can be life-saving, it may come with some side effects, including a sore throat, hoarseness, and difficulty swallowing. Here are some potential side effects of using an intubation tube:
- Sore Throat: Many patients experience a sore throat due to the tube’s presence and the procedure itself.
- Damage to Teeth or Mouth: The tube’s insertion can sometimes damage teeth, gums, or lips.
- Vocal Cord Damage: Intubation can lead to temporary or permanent damage to the vocal cords, affecting speech.
- Infection: There’s a risk of infection at the site where the tube is inserted or in the lungs.
- Pneumothorax: Air can escape into the space around the lungs, causing them to collapse.
- Tracheal Injury: The tube can cause injuries to the trachea or windpipe.
- Bronchospasm: This is a sudden constriction of the muscles in the walls of the bronchioles, which can cause breathing difficulties.
- Esophageal Intubation: Incorrect placement of the tube in the esophagus instead of the trachea can lead to serious complications.
- Increased Intracranial Pressure: Intubation can sometimes increase pressure within the skull, which is risky for certain patients.
Special Considerations for Endotracheal Intubation
When a patient has certain conditions like asthma, COPD, or neck injuries, doctors need to be extra careful with intubation. These conditions make the process more challenging and require special techniques and precautions to ensure the patient’s safety.
Asthma
Asthma makes the airways very sensitive and swollen, which can make intubation tricky. Here are some key considerations:
- Gentle Approach: The doctor must be very gentle when inserting the tube. Rough handling can worsen the swelling and narrow the airways even more, making it harder for the patient to breathe.
- Medications: Before intubation, medications called bronchodilators may be given. These drugs help to open up the airways, making it easier to insert the tube. Steroids might also be used to reduce inflammation.
COPD (Chronic Obstructive Pulmonary Disease)
COPD is a condition where the lungs and airways are damaged, leading to breathing difficulties like respiratory arrest. Intubation in these patients requires careful planning:
- Larger Tube: The doctor may use a slightly larger tube to ensure that enough air can flow through to the lungs. This helps the patient breathe better once the tube is in place.
- Extra Oxygen: COPD patients often need more oxygen. The ventilator settings are adjusted to deliver the right amount without damaging the lungs.
- Avoid Over-Inflation: The ventilator settings are carefully monitored to prevent over-inflation of the lungs, which can further damage already-weakened lung tissues.
Neck Injuries
Intubating patients with neck injuries is particularly delicate because any movement can make the injury worse:
- Minimize Movement: The neck must be kept very still during the intubation process. The doctor may use a special technique called manual in-line stabilization, where another person holds the head and neck steady while the tube is inserted.
- Special Tools: Sometimes, special tools like a flexible bronchoscope are used. This tool allows the doctor to see inside the airway and guide the tube in without moving the neck.
By understanding these components, steps, and special considerations, you can see how important and delicate the process of using an endotracheal tube is.
Read More: How to Manage a Respiratory Arrest?
Final Thoughts
Endotracheal intubation is an essential procedure in emergencies and surgeries, ensuring that patients who can’t breathe on their own get the oxygen they need. Knowing the parts and how to use an endotracheal tube properly can improve patient outcomes. Each step, from preparing to monitoring, needs to be done carefully to keep the patient safe.
Knowing how to use an ETT can be life-saving in emergencies. Whether you’re a healthcare worker or just want to learn more, understanding intubation can help you act confidently in critical moments. Registering for a BLS course can help you get trained and learn these skills. Get started today!


